A rostering integration involves automatically importing student and teacher roster data into QuaverEd’s system.
It is important to note your district must have a Single Sign-On (SSO) integration with QuaverEd in order to use automated rostering.
Select one of the options below for more details:
- OneRoster CSVs delivered via sFTP
- Classlink OneRoster API
- Infinite Campus API
- PowerSchool API
- Auto-Registration
- Rostered License Management
- Integration Support
Ready to get started? Have your IT Administrator contact our team at integrations@quavered.com!
About OneRoster
A OneRoster CSV rostering integration requires that you submit a set of .csv (Comma Separated Value) files that comply with the 1EdTech OneRoster 1.1 format.
The formatting instructions presented below are intended to simplify the information provided by 1EdTech in regard to producing the OneRoster 1.1 format.

OneRoster Format Overview
Please note that each data table is a .csv file.
Click here to view a breakdown of each file.
Download a template of each file.
| CSV File | Description |
| manifest.csv | Contains the list of files that are supplied in your upload. |
| academicSessions.csv | Describes the quarters, semesters, or terms during which classes will be taught. |
| classes.csv | Lists the classes taught for each course. |
| enrollments.csv | Assigns users to their various classes |
| users.csv | Describes the various users of the organization. |
| orgs.csv * | Describes the organizations to be included in the roster information. |
| courses.csv * | Establishes the course to which multiple classes may belong. |
| demographics.csv ** | Describes the demographic information of each user. |
** This file is optional. – QuaverEd does not use this information.
If your district intends to set up Auto-Registration, you will need to send additional .csv files. Please refer to our Auto-Registration documentation for specific instructions regarding your roster data.
Download a template of each file.
| CSV File | Description |
| resources.csv | Contains resource information that will be used to link a teacher to a Quaver license via a class or course. |
| classResources.csv | Links a resource from resources.csv to a class |
| courseResources.csv | Links a resource from resources.csv to a course |
Delivering OneRoster Files
Step 1: Provide IP address, and connect via sFTP
Please email the Quaver Integrations team at integration@quavered.com to request SFTP credentials. Please provide the public IP address that will be delivering your files.
You may establish a connection using any capable sFTP client. Quaver operates on the default sFTP Port 22. A successful connection will open to your district’s root directory automatically.
Step 2: Deliver roster files
Locate your OneRoster files in your local file system, and upload the OneRoster files to your root directory ‘/’ on the Quaver server.
Please ensure that all files are named exactly as specified prior to transfer, including the .csv suffix. Be sure to verify that the transfer of each file completed successfully.
Step 3: User testing
After your first file set is delivered to production, we will need to test with a Quaver teacher in the district to ensure that their rosters are built correctly when they go through the typical workflow. You should identify a teacher who currently uses Quaver and is willing to participate. The more responsive this teacher can be, the faster testing can proceed.
Remember that an automated rostering integration with QuaverEd also requires users to be able to log in via a Single Sign-On (SSO) integration.
Testing involves two steps:
- The teacher will log into Quaver using your district’s SSO method.
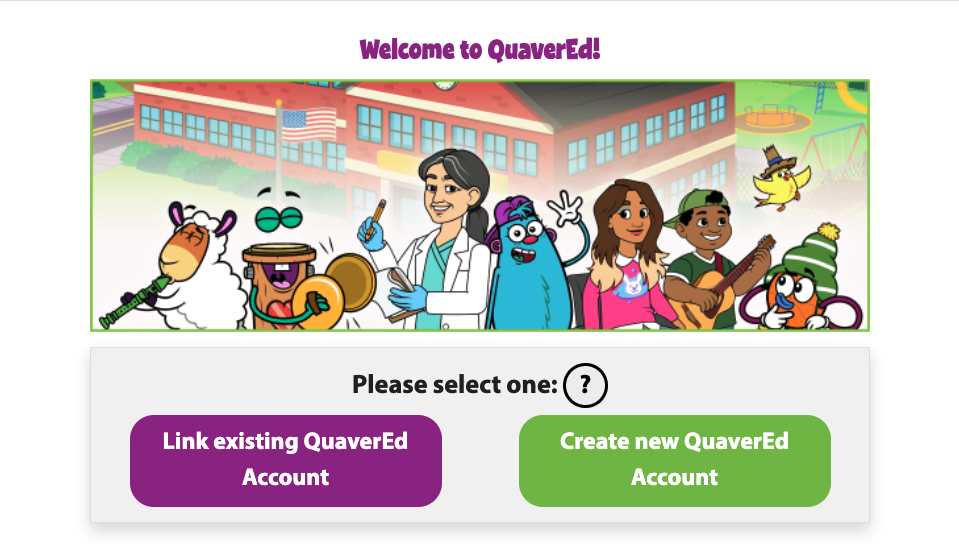
- If this is the user’s first time signing in via SSO, they will see our account provisioning page.
- When prompted, the teacher should select “Link existing QuaverEd Account” and enter their Quaver account credentials.
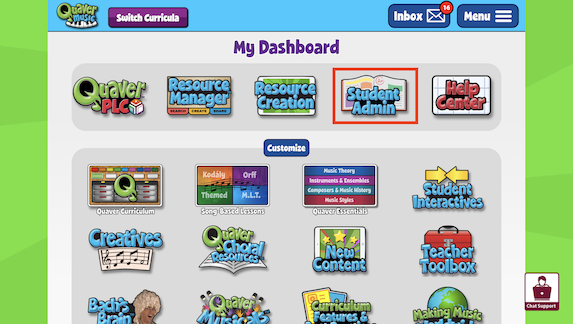
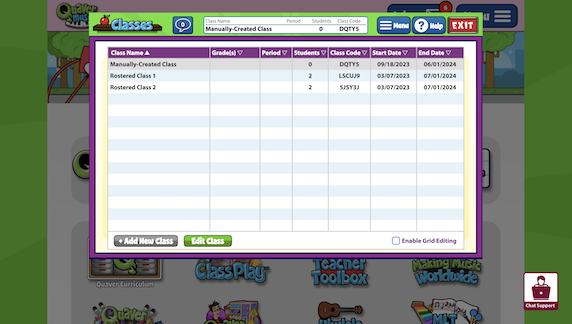
- The testing teacher will need to check their Classes and Student Accounts in the Student Admin section of the Teacher Dashboard. If the test is successful, the teacher should see their rosters automatically populate.
Step 4: Scheduling regular file delivery
You can submit updated file sets to the production server as frequently as every day. We process files on a nightly basis. Sending updated files regularly ensures that teachers have accurate rosters in Quaver.
Step 5: Release
Once we have confirmed that the rostering integration is working properly, we will launch the functionality district-wide.
ClassLink API Rostering Setup
Step 1: Add our ClassLink OneRoster API app
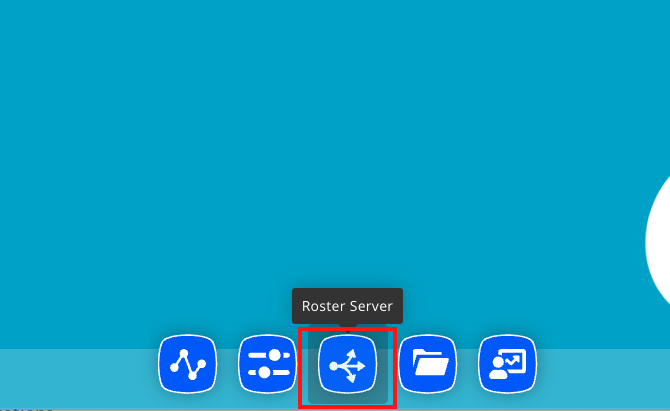
- Log into your ClassLink Dashboard with your ClassLink Admin account and select the Roster Server icon.
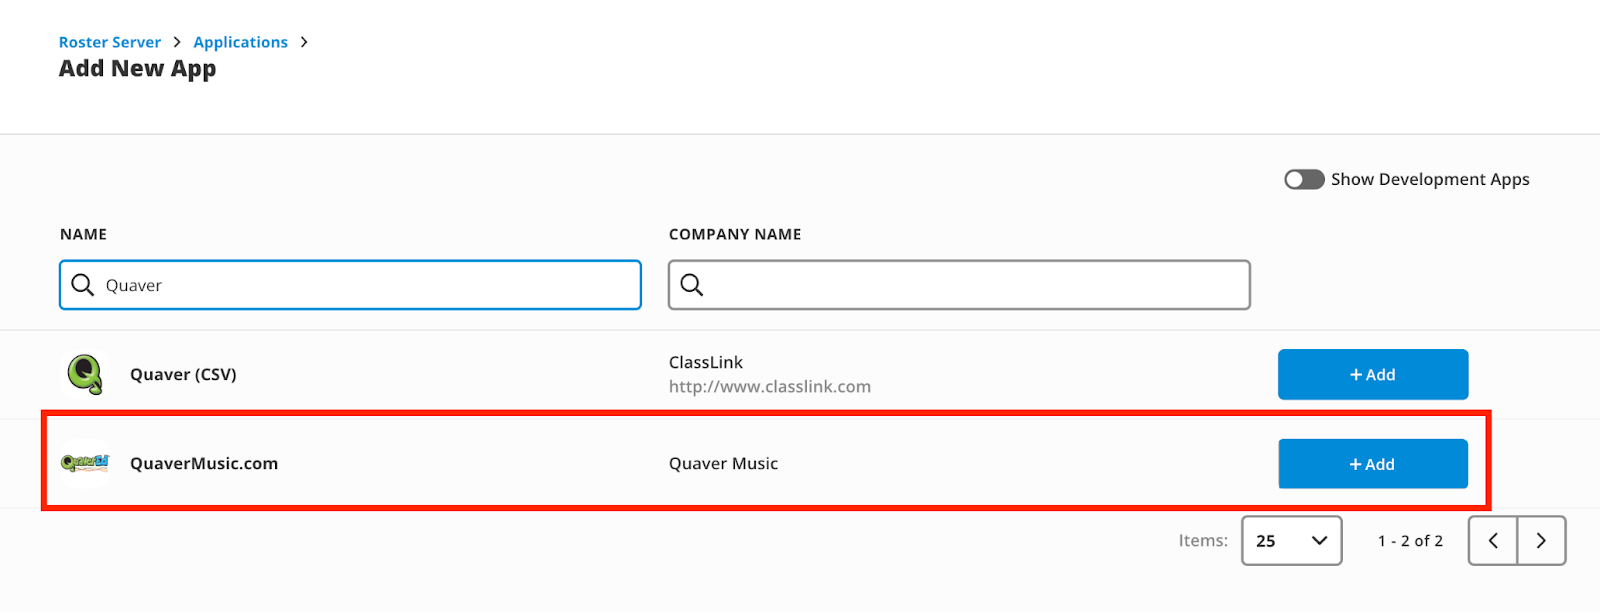
- In your ClassLink Roster Server console, select Apps. On the Applications page, select the + Add button.
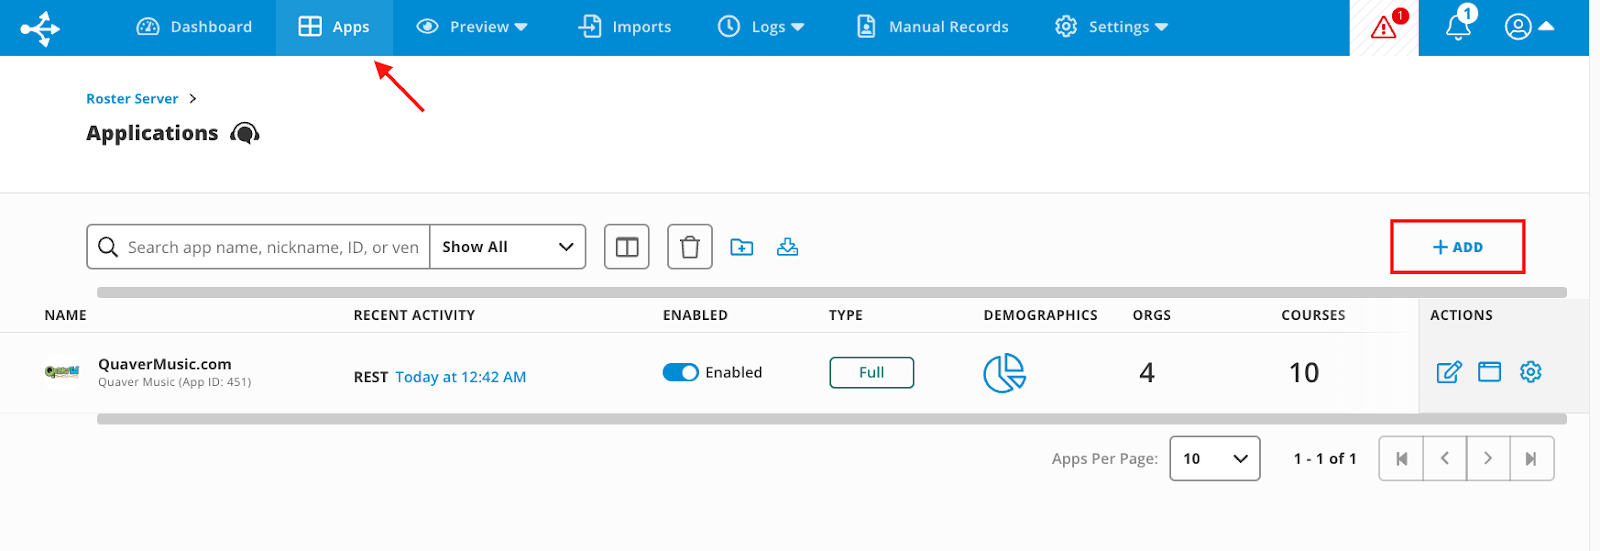
- Search for “Quaver” in the finder. Select the + Add button next to the “QuaverMusic.com” app.
- You should now see the QuaverMusic.com app appear in your Applications on your ClassLink Roster Server. Ensure that you have the settings for the app set to Enabled and Full.

Step 2: QuaverEd configures your district for roster syncing with ClassLink
Let our integrations team know once you have added our ClassLink OneRoster API app. We’ll need to set things up on our side to pull your district’s data from ClassLink.
Step 3: Testing
Remember that a rostering integration with Quaver requires that we also integrate with a Single Sign-On (SSO) system used by your district.
Have a licensed QuaverEd teacher log in via your district’s SSO integration with QuaverEd (this may be in ClassLink or another platform) to test whether the roster sync is working correctly. If this is that teacher’s first time logging into QuaverEd via SSO, they will see our SSO account provisioning page. This page is essential!
When a licensed QuaverEd teacher has successfully logged in via SSO and reached their QuaverEd account, the teacher’s roster sync will activate. At this point, the teachers should see their rosters automatically populate in the Student Admin area in QuaverEd.
Step 4: Release
When we have confirmed everything is working as expected, we will release your integration on our end.
Infinite Campus API Setup
QuaverEd is an Infinite Campus Digital Learning Partner. Read below to learn about integrating with QuaverEd through our supported app in Infinite Campus.
How to set up a OneRoster Connection through the Infinite Campus API
Step 1: Generate Infinite Campus API credentials for QuaverEd
- Log in to Infinite Campus as an administrator
- Navigate to Digital Learning Applications Configuration
- Click Add Application and select QuaverEd from the list of Campus-supported partners
- Click +Generate New OneRoster Connection
- For OneRoster version, select OneRoster 1.1 with OAuth 2.0 and click Generate

6. Copy all of the fields in the Information to Share with QuaverEd section: ClientID, Client Secret, Token URL, and Base URL. They will be necessary to complete the Infinite Campus Integration with QuaverEd.
Step 2: Share QuaverEd API credentials with QuaverEd Integrations support
Contact our Integrations support team at integration@quavered.com and provide the credentials generated in Step 1. Quaver’s integration team will configure our systems to use your Infinite Campus API connection to roster students and teachers who log in via your configured Single Sign-On (SSO) method.
Step 3: Testing
To test that the roster sync is working properly, have a licensed Quaver teacher log in through your configured SSO platform. Once the licensed Quaver teacher has logged in to Quaver via SSO, they should see their rosters activated in Quaver.
Remember that an Infinite Campus rostering integration with QuaverEd also requires users to be able to log in via a Single Sign-On (SSO) integration.
Step 4: Release
When we have confirmed everything is working as expected, we will go ahead and release your integration on our end.
All Quaver teachers must log in through your configured Single Sign-On (SSO) platform to activate the roster syncing with Quaver.
PowerSchool OneRoster API Setup
How to set up a PowerSchool OneRoster API integration with QuaverEd
Step 1: Install and enable QuaverEd’s PowerSchool plugin.
Our integration team will provide the plugin* for you to download and install in PowerSchool. Once you’ve downloaded QuaverEd’s plugin, please install it according to PowerSchool’s instructions:
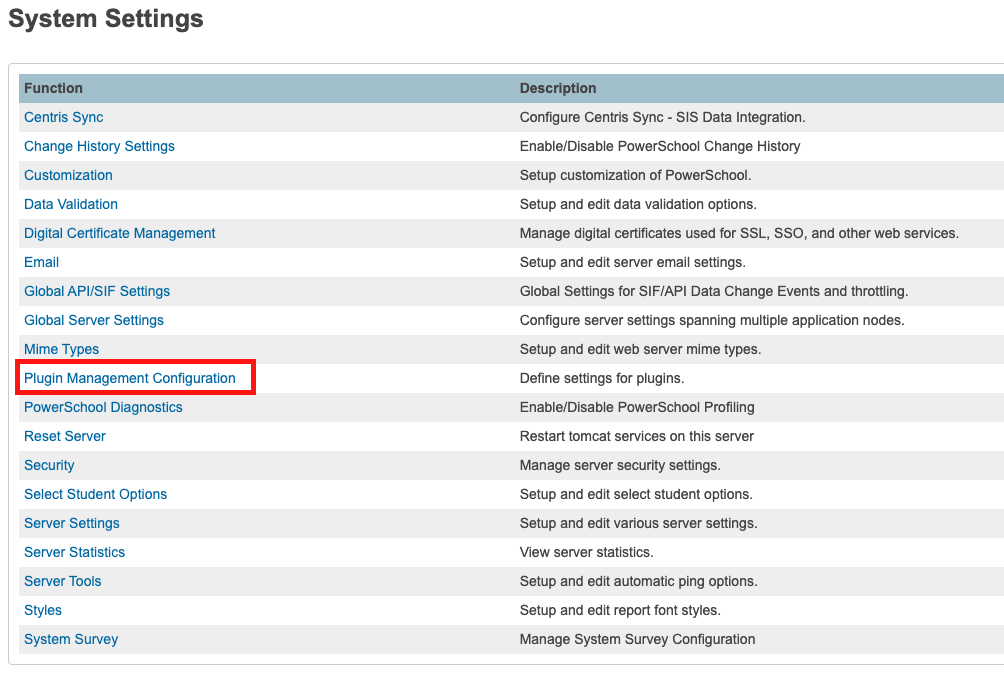
- Log in to PowerSchool as an administrator
- From the start page, select System from the main menu

- Under Server, click System Settings

- Click Plugin Management Configuration
- Click Install

- Click Choose File, and select QuaverEd’s PowerSchool plugin from your file browser
- Click Install again

- If the plugin installation is successful, the Plugin Registration pop-up will appear and display the information that will be sent to the registration server.

- Note the QuaverEd Plugin Client ID and Client Secret – they will be necessary to complete the PowerSchool integration in QuaverEd.
- Click Register
- In the Plugin Management Dashboard, find the QuaverEd plugin and check the Enable/Disable checkbox to enable the plugin

- Review the content, and click Enable to proceed

*If your district’s PowerSchool version is older than 21.4.4.0, please let us know. You will need to install the Universal Rostering plugin and then install a different version of our plugin file.
Step 2: Share API credentials with QuaverEd Integrations support
Provide our Integrations support team with the credentials generated in Step 1. Quaver’s integration team will configure our systems to use your PowerSchool API connection to roster students and teachers who log in via your selected Single Sign-On (SSO) method.
Step 3: Testing
To test that the roster sync is working properly, have a licensed Quaver teacher log in through your Single Sign On platform. When a licensed Quaver teacher has successfully logged in through SSO and reached their Quaver account they should see their rosters activated in Quaver.
Remember that a PowerSchool rostering integration with QuaverEd also requires users to be able to log in via a Single Sign-On integration.
Step 4: Release
When we have confirmed everything is working as expected, we will go ahead and release your integration on our end.
All Quaver teachers must log in through a configured Single Sign-On platform to activate the roster syncing with Quaver.
About Auto-Registration
An Auto-Registration integration automatically provisions the appropriate access levels and creates accounts for your teachers using your OneRoster data. In doing so, this integration removes the need for teachers to register their Teacher Access Code to gain access to Quaver. To do this we use the teacher’s name and email along with their associated schools to determine their access and create their account. A simple integration can be achieved by supplying the following data with an SSO and rostering integration:
- First name, last name, email, role (i.e. teacher, student, etc)
- OneRoster orgs data with NCES ID in the “identifier” field.
Note: If the OneRoster orgs data is not supplied, teachers can be given the option to select which schools they are associated with.
A more granular integration can be achieved by using the resources dataset of the OneRoster format. An integration using the OneRoster resources service can be set up via OneRoster.CSVs sent via SFTP, or with ClassLink OneRoster API (other APIs don’t currently support the resources service). This service is mainly useful if you want to control which teachers are granted access or have multiple QuaverEd products. Here are the pieces of information we need to provide this service:
- An SSO or rostering integration that supplies the following data for teacher users: first name, last name, email.
- OneRoster orgs data with NCES ID in the “identifier” field.
- OneRoster resources data with appropriate “vendorResourceIds” (QuaverEd will provide these)
- OneRoster classResources and courseResources to associate QuaverEd resources with a teacher’s enrolled class.
- Teachers in OneRoster users are associated with an org that has a valid QuaverEd license and enrolled as teacher in a class with the appropriate resource.
It is important to note that a rostering integration with Quaver requires that we also integrate via Single Sign On (SSO) for your district. To set up an Auto-Registration integration, reach out to the integration department at integration@Quavered.com.
About Rostered License Management
Rostered License Management (RLM) is an automated process for districts using OneRoster formatted (CSV or API) rostering with QuaverEd to help keep your teacher license access aligned with your roster data. Once configured, RLM runs on a weekly schedule during your district’s nightly sync and can automatically flag or remove access for teachers who no longer appear in your roster — reducing manual license management and freeing up unused license seats.
How It Works
Rostered License Management (RLM) runs on a configured day each week during your district’s nightly sync. On the first report day of each month, RLM both generates a report and processes any applicable expirations.
When a rostering issue is detected, affected teachers receive a pop-up notification at login informing them that their access is scheduled to expire due to a rostering discrepancy. Expirations are scheduled two weeks out, giving time to resolve any issues before access is removed. Access can be maintained by either updating the roster data, or by having the teacher sign in via SSO.
Note: If a rostering issue is corrected, access is automatically restored during the next nightly data sync — no manual intervention needed.
Rostered License Management (RLM) Features
User Existence-Based Access Expiration
If a teacher is no longer present in the district’s roster data, their QuaverEd license access is flagged for expiration.
School-Based Access Management
If a teacher has moved to a different school within the district, RLM will attempt to transfer their license access to a valid license at their new school. If a valid license exists at the new school, access is transferred and the old access is expired. If no valid license exists, access is left unchanged and the discrepancy is included in a report for the QuaverEd team to review.
Note: School-Based Access Management requires the district to have Auto-Registration enabled with school assignment active. Districts using School-Select upon Auto-Registration are not eligible for this feature.
Getting Set Up
Rostered License Management (RLM) is configured by the QuaverEd Integrations Support team. To get started or to learn more about RLM for your district, contact us at integrations@quavered.com.
Integration Support
Implementation
You should notify your Quaver users once the integration is available, and you are responsible for training your users on how to access Quaver from your district’s system. Please share our Help Pages with your users for step-by-step guidance.
Support
Email: integration@quavered.com
Contact Form: Contact Us
We will continue to provide integration support throughout our contract term. We are committed to providing responsive support for our integrations and will work with you to resolve any issues that may arise.
Filtering Roster Data
While Quaver would prefer to receive data tables that include only information related to Quaver classes, we do not require districts to filter that data before being sent to us. Therefore, we do not create rostered classes for a teacher in our system until both of the following are true:
- The teacher has logged into Quaver via SSO using an account that can be matched to a teacher submitted in the OneRoster users.csv file.
- The teacher has an active Quaver account (activated by a Teacher Access Code or Auto-Registration). Teachers usually receive Teacher Access Codes via email outside of this rostering process. If teachers have questions about their Quaver access, they should contact their supervisor or Quaver Support.
- Note: Rostered student accounts do not need to enter any codes to gain access to student content.
Updating Your Integration
Please notify us prior to making any changes to your district’s SSO or rostering configuration. This is especially true when changing your sourcedId schema, which will disrupt your users’ experience on QuaverEd.com.